Thursday, February 18

The ultimate lean mean Pi hacking machine!


As I was writing my previous two articles Upgrade you old laptop with a Raspberry Pi and take two of the same I was thinking that it would have been really cool to be able to attach the Pi on the laptop in a way that it would have been easy to detach if need be and that it wouldn't have had to be permanent. Some laptops aren't as decrepit as mine and having the possibility to remove whatever I was going to use to attach the Pi was important.

After a while I came up with this little kit which is just enough to get your Pi tailless but that could be further expanded to allow for physical computing experimentation via the GPIO and a breadboard.


An OS that is really promising as the ideal companion of this kit is SBIOS which would make this whole thing the ideal lean mean Pi hacking machine.


Friday, February 12

ESXi home recipe


Why would I want to consider ESXi in the first place? After all you can have VirtualBox, VMware player, KVM, Xen, etc. Well first of all because I am familiar with it but also because it is a Hypervisor type 1 and because I think VMware is probably the best platform out there.
If you can install a type 1 Hypervisor the benefits can be substantial, the resource utilisation is better managed and more efficiently shared amongst the various guests VMs.

In selecting my new hardware to rebuild my home ESXi server I have chosen CPU, RAM and motherboard to make the most of virtualisation without braking the budget too much.

My requirements were


CPU: high number of cores, Intel Hypertreading Technology and Intel Virtualisation Technology
RAM: needed to be reasonably fast but mostly generous enough. Good £/GB ratio to get as much as I could.
Matherboard: a part for being able to host the CPU and RAM of my choice, I wanted something essential but with at least 4 SATA ports. No matter the type of SATA disks that I was going to use in fact, I wanted to give the various VMs as many independent I/O paths and as much bandwidth as possible. It also had to accommodate at least three network cards in addition to the one on board, more on the why later on.

The configuration I went with


Intel Core i7 4790K (The "K" didn't matter so much but the price was very low ;)
Corsair Vengeance Pro 16 GB (2 x 8 GB) DDR3 2400 Mhz (I could have taken something slower but again the cost was the same)
Asus Z97-P (Cheap enough, good quality and ticks all my needs)


With this, I had 4 cores with Hyperthreading and VT which could provide 8 vCPUs without relying to much on over allocation. Although ESXi has a great scheduler  and will manage more than 8 vCPUs despite the 8 physical ones but for the moment we won't worry about this.
The same can be said for the 16GB that will be more than plenty for a while and won't need to make use of memory sharing. ballooning or any other ESXi trickery to over provision resources. As my weak spot will be SATA, the more I can keep in memory the better will be.

The build of this new server was quite a refreshing experience for me. Although I started my geek life in computer shops doing just that, it had been a long while since a built a PC from scratch and things changed substantially since then. I believe my last PC build was something like a PIII socket 1!!! The end result wasn't so bad.


Get ESXi the way you want it


The part the matters next is how to retrieve, custom and install ESXi for you box. It turns out that there is an ocean of resources out there and some are really well put together.
That is the case for VMware Front Experience which is so incredibly full of information that I will hardly be able to contribute any further. In fact that's it! End of the article. :)

One of the things that I read in this site before I made my final choice of  motherboard, was to do with what drivers are currently included in ESXi base image and what is anyway still available to add back in should you need to. You can get a good feeling of the supported devices and technologies thorough VMware Compatibility Guide although not too much will be relevant for home computers like the one I build.
Packages which have been removed but are still available, can be found here and can drive which hardware are you going to need to buy. Not least the type of network cards which in my case is the almighty Realtek for the on board and a bunch of additional Intel NICs.
The list above will eventually be used to create a custom version of ESXi in which we can add back all the drivers that we need and that are no longer included. In addition to the Realtek drivers I have also added back the SATA AHCI controller which I think the majority of us would want in our custom image.

Without even needing to get the base image from VMware, on VMware Front Experience you can get a wonderful tool that will take the base image, add the drivers you want and repackage it. Wow!!
The customiser is a great tool and in its latest incarnation is a PowerShell script that relies on PowerCLI to run. In addition to downloading the script you will also then need the PowerCLI.

As I said the customiser will be able to download the base image on its own but we also need the PowerCLI and the vSphere client for later and most importantly your free licence which still needs to be installed to remove the trial day limit. Considering this you might as well get on VMware vSphere site, get yourself an account and download the following which at the time of writing are about vSphere 6.0:

  • VMware vSphere Hypervisor 6.0 Update 1 (optional)
  • VMware vSphere Client
  • VMware vSphere PowerCLI 6.0 Release 3

Get the image ready

Using the customiser is very easy and well described on its page. The command I needed to run was:

.\ESXi-Customizer-PS-v2.4.ps1 -v60 -vft -load sata-xahci,net55-r8168

and with this I get my base image including my SATA and Realtek hardware. Brilliant!


Now, I do not have a DVD/ROM on my new box, neither did I on the previous one. I much prefer using USB keys for my installation. After all I would need the DVD/ROM only once! A bit of a waste if I'd leave it there, wouldn't it?
In order to make your image USB bootable you need to use a really nice piece of software called Rufus which will help you do just that.
So with the image we have just created let's get Rufus do the rest as described in this article


Before we move onto installing ESXi let's make sure that Hypertreading and VT are enabled in the BIOS and that the SATA controllers are set as AHCI not RAID. The kind of RAID available on home motherboards is not good for ESXi. The way you do this depends on the motherboard and BIOS you have but generally it is around advanced and CPU properties.
One things you also might want to do is disable anything that you are not certainly going to use e.g. the audio card.

We now can put our USB key to good use and finally boot our new server. The installation process is quite easy and not much get's to be decided during it. The image is very light and will install in very little time.

Configure you new "home cloud"


This article describes quite well what happens and what need to be done during and after the installation. It is for version 5 but it won't make much difference at all.

In the meantime that the installation is progressing we can install the vSphere client (VMware-viclient) which we will need in a short while. The client needs a Windows box so find one somewhere and go ahead to install it.


The very first bit of configuration that we need to do after the installation is finished is to give an IP address to the management interface through which we will connect to with the vSphere Client. It will have most probably gotten one from the DHCP but you are better off configuring it with a static IP.


Have a look at this little complementary video I made of the installation and initial configuration.


Once the installation is over and the management network is configured, we can then finish the initial configuration using the fat client we installed on a Windows box somewhere.
First we login. Do not tick using Windows credentials as it won't work. In our case we need the local credentials we inserted during the installation.


First lets' check that all is as we expect.

We have our 8 CPUs,


We have our 16GB of RAM. (Note how small is the footprint for ESXi)


Then we want to go ahead and set at least the time, the DNS and same basic networking.


This is why I needed those many network cards. I am running my home firewall as a VM and have created quite a few virtual networks for that. This could be an article on its own as it involves also my router and VLAN tagging so I won't go any further at this point. Just bare in mind that you will need to at least define a few or at least one Virtual Machine Port Group and that in the majority of cases it might be on the same switch (vSwitch0) in which you have already defined your Management Network.


The storage should already be OK from installation but if as I did you want to add more disks this is where you should go.


Back it up and goodbye


Backing up your VMs will be an essential task to carry out regularly and it was certainly something I used to backup mine before I moved them on the new server. For this I use a nice and intuitive too from Trailed called VM Explorer. In its free version it has some limitations (e.g. it won't do restores) but nothing that can't be overcome with some sweat and creativity.


I hope I did not confuse you too much and that I haven't left too many things out. If I did let me know!
Happy virtualisation

Monday, February 8

Fablab London - Hands-on Digital Fabrication


I was at the Fab Lab in London a few days back to get a closer look at 3D printing, laser cutting and well, as I found out at digital fabrication in general!

As we arrived we were welcomed by Tony Fish, Susana, Heman and Nealesh to be given a tour of the Fab Lab and get a feeling of what digital fabrication is really about.
Susana, Herman and Nealesh are interns at the FabLab and they are themselves skilled makers with a very nice project crowd funding as I am writing. The project is called Pegged-In and their website is a must see as it is a piece of art in itself.

Tony suggests that we are at a turning point with regards to technology and that the digital world should now turn its attention to moving from pure ether to the physical world. Something, he says, that can be achieved by new technologies like 3D printing and laser cutting but mostly by a community which is more than ever detaching from the sole role of being consumers to become owners and manufacturers of their own ideas.
Ideas which are also worth spreading in a manner that takes a lot of the open source ethos.

The FabLab London opened a year ago in what had been one of the hottest day in a long while, on the day we were visiting it was a rather chilling January morning just a few degrees above zero. The lab was anyway a warm place, full of energy and people buzzing about doing the most disparate things form modelling, to design, coding, meeting with others, crafting, you could enter the FabLab with an idea and get out with an actual product in your hands! Yes because the Fab Lab is not just a furnace of ideas but mostly a very practical, pragmatic place where ideas become reality.
The two main services the lab offers are in fact the digital fabrication and the rapid prototyping whereby the lab staff will help you refine your project and create a usable prototype of it.

The session was mostly aiming to be an informative one to bring awareness and get a little flavour of what this new revolutionary approach to "making" is about. It was mostly addressed to journalists so that when they would write on the subject of digital fabrication they would be more knowledgeable about it. I was obviously an intruder.
The approach of the session was then intended to be more pragmatic than simply a tour of the lab so that we could have ended up making something in the end. That;s what hands-on is all about!

The FabLab comes out of MIT and there is now more than 600 around the world. It was started on questions like: "How do we make sure that a product can be replicated exactly every time, the millionth one equal to the first?"
This lab opened September last year and is already counting 10K people that went through the lab showing how successful the idea has proven.

The first rule of FabLab is: learn, make, share. This applies to everything from coding to electronics, from crafting to sewing.
Making lets you realise how difficult and valuable manufacturing, designing and developing a product is and also how new skill sets are needed to foster and sustain this new movement.

People in the FabLab come from several backgrounds and this is what makes the place such a resourceful environment. One of the intern for example comes from a designer background he is a product designer, another is a physic, others have electronics engineering background and so on.

As Tony was finishing his welcome speech he showed us the cannon ball that Martina had skilfully transformed into a piece of art by creating little magnet boats and an elegant stand.


After the introduction we moved immediately in the area where the 3D printers were busy working, buzzing about and depositing material layer after layer.


The 3D printers are essentially made of a table that moves vertically up and down and a nozzle that squirts heated plastic onto the table. The nozzle moves along X and Z coordinates via two stepper motors and deposits the plastic on the table with extreme precision.
The plastic is heated at 220 degrees and the filament is pushed through the nozzle by cogs in a mechanism at the back of the printer which steadily moves it through the nozzle for it to melt it.


A good enough printer would cost in the range of £1700 allowing for products which are rendered with a very good quality. But there are printers for all sorts of budgets starting at as little as £200/£300. A filament costs around £20 for 750g reel.
The quality depends on how precisely the objects are created in much like the same way as you would measure video cards or traditional printers resolutions. The smaller is the detail that you can render the better is the resolution of the 3D printer.

The initial set-up of a printer, especially for the not so expensive ones, can be rather tricky and although a set-up software will guide through the process, it might require some time to get through the whole thing.  Getting used to your printer will help you over time to spot problems with the tuning and quickly put the printer back in check.
The table will need to be perfectly levelled, the corners to which the nozzle will move to will have to be precisely identified, the distance of the nozzle from the table will have to be perfectly set and other settings will have to be adjusted from software for every object created. A bit more work then you would need to do than with your normal printer I guess but you are printing in 3D!
More expensive printers will come with a set of sensors which allow for the printer to auto-calibrate but that increases the cost quite substantially.
The majority of printers will only use one colour of material but there are already some that can handle two different types of filaments.

With regards to the materials used the filament can be made of reusable PLA a fantastic things which is also great for the environment.and that allows for discarded materials to be reduced back into pellets and reeled as filament once again.
At the FabLab they had bought a new tool just for that.


The most common filament is the PLA but there other types depending on the design requirements. Some come with conductive material, some are photoelectric, you can have wood like, glass, metal; the sky is the limit
Even when it comes down to the printer itself the choices are many. Some printers can be build by laser cut material like wood or acrylic, some like the RepRap can reproduce itself!

This is the one on which we practised our skills or should I say lack of thereof :)


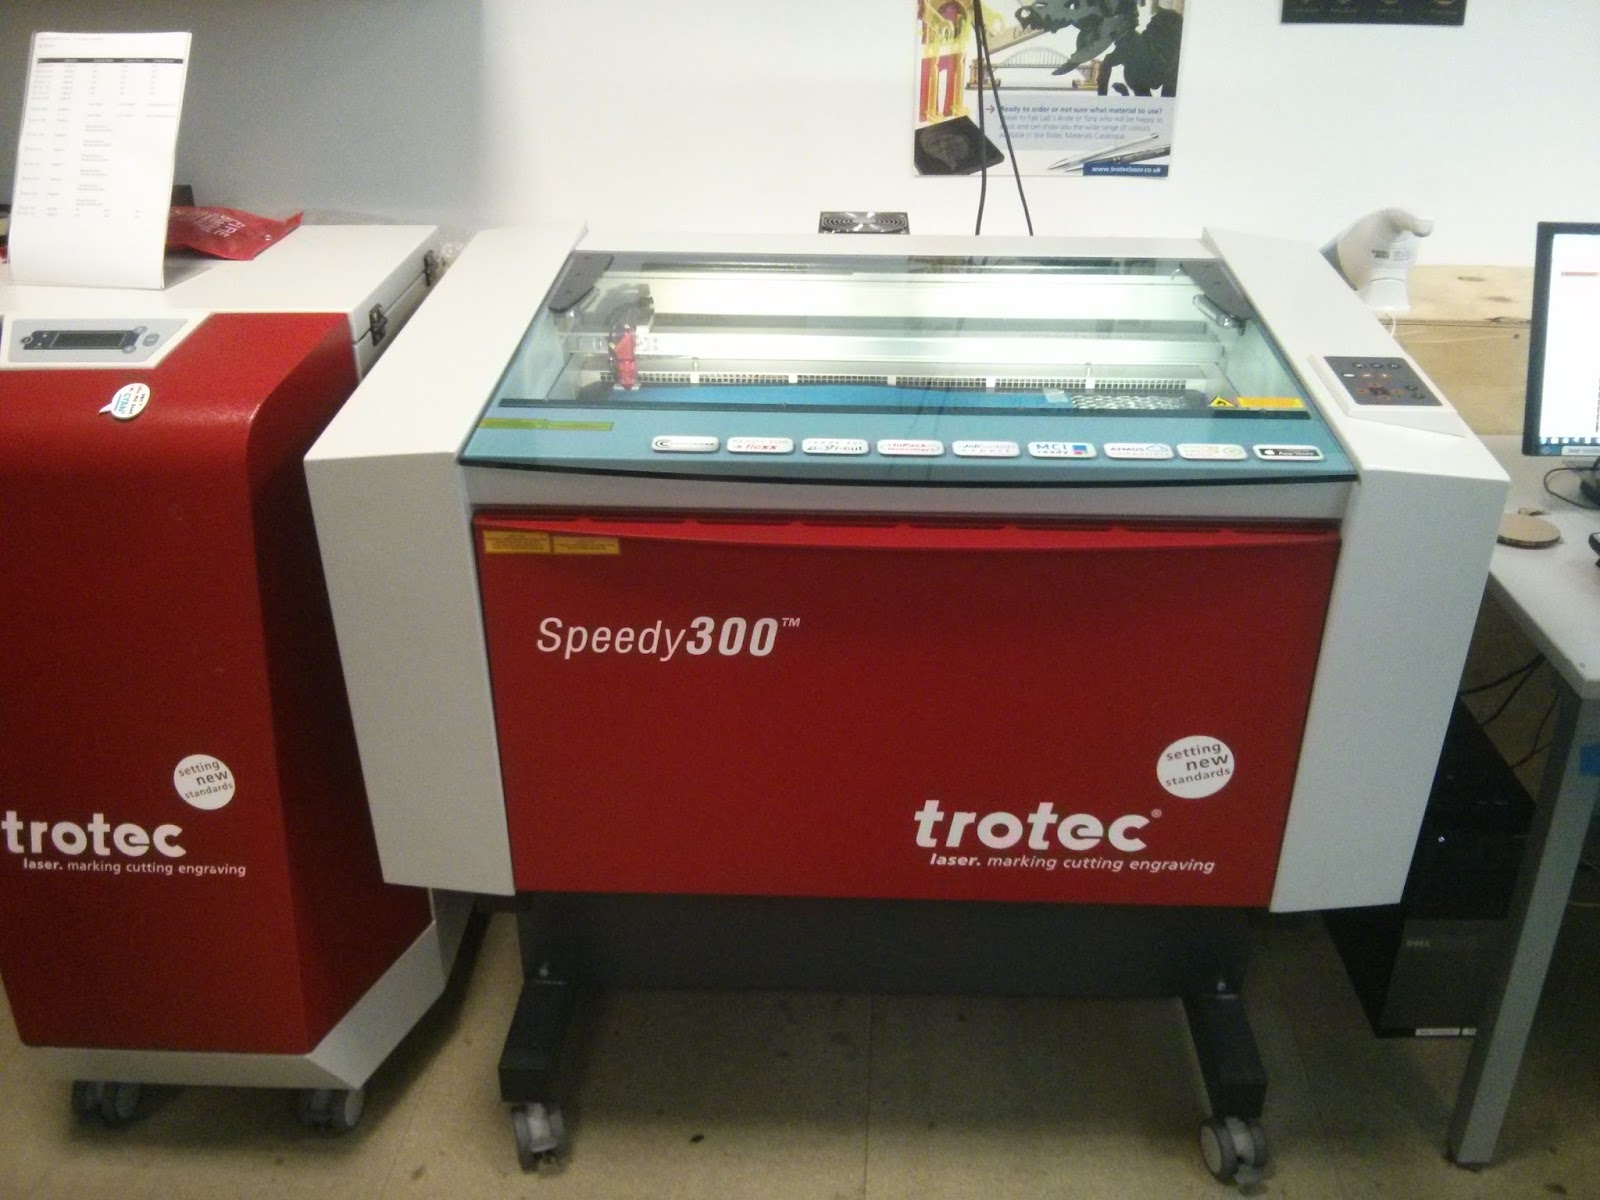
Next we were in ore of the laser cutter where we met Helen that was cutting cardboard for a box she was preparing for an Arduino based kit targeted to schools for STEM. I was later able to see the finished product at Bett Show 2016.


The principle of the laser cutter is very similar in this case to the traditional pen plotters (if you are old enough to have seen one) except that instead of using a pen this cutter fires a laser on the material underneath. The power of the laser, the speed and the frequency of the pulses can be adjusted in order to work on different materials. Too much power and you are burning the material too much. too little and you won't cut it. Changing the parameter also allows for the laser to work as an engraver and instead of going completely through the material it will only "scar" it to a chosen depth.


Having a laser cutter is not only expensive because of the cost of the cutter itself but also for the space it takes and for the infrastructure that goes with it like the extractor fan for the fumes. Not something you could easily have at home!

At the FabLab there is also a well set-up electronics lab full of components and tools which can accommodate the majority of your needs.

Next to it there is a workshop for mechanical works complete with a lathe where we found somebody making parts for a clarinet! When I said you can anything at the FabLab I actually meant it.

Passing in front at the spaces that can be used for work groups to come together and develop ideas, we eventually got in the last section of the FabLab.
At the end of a narrow corridor we found Martin and the lab manager Frank busy at work with computer programmable sewing machines. By using conductive thread they were getting ready for a workshop to be given to 25 French teachers which on their way to the Bett Show 2016 also wanted to visit the FabLab to gain some insight in digital fabrication. The kit was not ready but we could already see from the sketches on the white board and the prototypes being worked that it would have become the basis for a rather interesting workshop on wearable technologies.

That concluded our little tour of the lab and off we went to practice on the 3D printers.
After being given a bunch of laptops we were instructed to visit the website Thingiverse where anybody can go and find a design for something that would be later fed to the 3D printer.
The printers in fact have an SD card reader and through a display you are given the possibility to choose the design on that card that you want executed.
Some parameters needs to be set on the downloaded design like whether you want to print a draft or an accurate reproduction of the object. This is done through a modelling tool and once saved the file is ready for the printer. Depending on the parameters chosen you are also advised of the time it will take to print the object so that's when it is very important that you understand the implications of your parameters e.g. draft or quality will change the time dramatically.

In the end I managed to get away from the lab with just a small keyring but what counts more with a much better understanding of what digital fabrication is about and of the many opportunities it is starting to offer.


The lab is opened free of charge on Fridays for the public and during the week you can use it at a cost.
So what are you waiting for? Visit the FabLab closer to you and get ready to learn, make and share.


Saturday, February 6

Upgrade you old laptop with a Raspberry Pi - take two


What if you want to connect your Raspberry Pi tailless but use a Windows OS on your laptop?
Well don't despair, there are ways to do that and a few tricks that will allow you to do so under several circumstances.

So let's recap what do we want to achieve. We want to connect a Raspberry Pi to a Windows computer, typically a laptop so that we can use the Keyboard, the Mouse and the Monitor of the laptop and replace its "engine" with a Raspberry Pi.
Old laptop or not this solution also makes for a great way to make your Pi a lot more portable. In this tailless configuration the only cable you might have is the power supply to your laptop!

Be weary that I have used  a Windows 7 for the laptop and Raspbian Jessie for the RPi. Things may be slightly different using other versions.

This article should also serve as an Errata Corrige for my previous one with regards to the Pi's support for Link-Local address. I will amend the previous post ASAP.

Requirements


Laptop

HW:
At least two USB ports
Ehernet adapter
WiFi card (optional)

SW:
A functioning Windows OS
VNC or RDP client

RPi

HW:
WiFi card
Ethernet card

SW:
VNC or RDP server (which regrettably needs to be installed upfront)

To glue them together we also need a USB Y cable and a 20-30cm Ethernet cable (Cat 5e or +) straight or crossover.

Networking


The first hurdle that we need to solve is how to try to make the laptop talk to the Pi at IP level. For that to happen the two must be connected at layer 1 and 2 of the OSI stack. The Ethernet cable plugged in your laptop's NIC and in the Pi's one does just that. It provides physical connectivity and data link. What we don't get as easily is two IPs in the same subnet.
This can be achieved in many ways, let's see a few.

Bonjour Windows


First things first though let's talk about how to allow Windows to resolve the

raspberrypi.local

That we are going to use to connect to the Pi independently from its IP address. Dealing with IP addresses is in fact quite a pain, that's why DNS came about after all. In my previous article I mentioned the good that comes with mDNS so that you can reach raspberrypi.local independently to which IPv4 or IPv6 you are using on the Pi.

Windows does not come natively with mDNS but there is a piece of software that we can install from Apple to install this protocol under Windows. Apple's interpretation of mDNS is called Bonjour and can be found here

Installing it is extremely easy and you will be able to use it straight away. Thanks Apple!
Once installed if you check the services running on your laptop you should see something like this:


Back to IP now. The first thing you should do it to disable any protocol and service that is not quite necessary from the Local Area Connection Property page of your laptop Ethernet's card. This is what I did:


Using APIPA


Automatic Private IP Addressing is Microsoft's interpretation of Link-Local address and it is a way of auto assigning IP addresses to hosts within a network segment without the need for a DHCP (service that is typically the job of your home router or NAS). A Class B of IP addresses has been reserved just for this purpose.

169.254.0.0/16 or 169.254.0.1 through to 169.254.255.254 with 169.254.0.0 being the subnet and 169.254.255.255 being the broadcast address. The network mask is 255.255.0.0.

Which in itself is quite a lot of technical gibberish but bare with me.

Now in the absence of a DHCP a Windows system (or any other OS supporting Link-Local address) will be configured as 169.254.x.y and this is the case for the Pi too with Raspbian Wheezy or Jessie.

I know I have said in my previous article that it didn't but ... it turns out it was grapevine knowledge which I would have been better off verifying first. I'll amend the other article ASAP.

The following screenshots illustrate the status of the adapters and of some other aspects at the network level of both the laptop and the RPi.


Note that once the two hosts communicate with each other the IP of the RPi will be evident in the ARP cache of the laptop


Booting your Pi after plugging the network cable and power is enough for your laptop to resolve raspberrypi.local in an IP 169.254.x.y with no extra hurdles. At this point you could already connect to your Pi via VNC by configuring the service on the Pi as I explained in my previous post


About IPv6


All works well also with IPv6


The Pi's sets itself up with an IPv6 and from the laptop pinging raspberrypi.local will successfully resolve and reach the Pi's IPv6 address:


As well as the IPv4.

These are screenshots of the laptop's network info:


Static IP addresses


If your laptop has an IP configured for its Ethernet adapter that you are not willing to alter then you can use the cmdline.txt to configure the Pi with an IP in the same subnet as you laptop. Easy!

dwc_otg.lpm_enable=0 console=ttyAMA0,115200 console=tty1 root=/dev/mmcblk0p6 rootfstype=ext4 elevator=deadline fsck.repair=yes rootwait ip= x.y.z.w

You need to edit the cmdline.txt file in /boot and add the part highlight in bod above. Make sure that all the text is on one line only.

The format is ip=<client-ip>:<server-ip>:<gw-ip>:<netmask>:<hostname>:<device>:<autoconf> so you can add other parameters if you need to. The netmask might be one that you want to set right.

More simply you could configure the eth0 of the Pi once it is booted if you have access to the GUI before making it tailless on your laptop. A good time to do this is when you install you VNC server


The following screenshots illustrate the status and configuration of the adapters and of some other aspects at the network level of both the laptop and the RPi.


DHCP via ICS


An easy enough solution to connect to your Pi is to leverage on the Internet Connection Sharing functionality of modern Operating Systems like Windows. ICS will let you share a connection on your laptop via another one. Your laptop may have a WiFi card connecting you to the Internet and an Ethernet adapter. ICS will allow you to share the WiFi via the Ethernet NIC, anything connected via an Ethernet cable to the laptop will receive an IP address and will be able to use the WiFi as a gateway to the Internet.

Now we could be interested in just that but I said that we wanted to use old laptops just as KVMs not also as Internet gateways, there is nothing wrong with that but accessing the Pi from elsewhere than the laptop with this configuration may be troublesome if not plain impossible.
What we are very much interested in is the fact the ICS transforms the Windows OS in a DHCP on the shared network adapter so that we can have our IP!

To configure ICS in Windows the sharing must be activated on the interface that we are going to be using as gateway. In my example below I am using my WiFi as gateway and activating the share on the local network adapter


Once that's done the local network adapter will receive an IP address in the range 192.168.137.0/24 which topically will be 192.168.137.1


Note that as the laptop provides an IP to the Pi, the Pi's address can easily be found by looking at the ARP cache of the laptop


The Pi receives an IP like 192.168.137.x as did mine


All this good though comes at a price. The DNS resolution and the default route of the Pi are configured as if we wanted to use the laptop as our gateway. In order to use the Pi's WiFi card instead we need to alter the file
/etc/resolv.conf


And comment out the line which bares the IP of the laptop.
Next we need to remove the default route once that has once again the IP of the laptop by running:

sudo route del -net 0.0.0.0 gw 192.168.137.1

Lastly we need to setup the IP as static on the Pi as explained in the previous section and this time use the IP we were given with ICS which was 192.168.137.136. Make sure to untick "Automatically configure empty options".


Tip


You can change the subnet 192.168.137.0/24 to whichever you prefer by editing the registry

HKEY_LOCAL_MACHINE\System\CurrentControlSet\Services\SharedAcces


I only have an Ethernet card on my old laptop


In this case we need to trick the OS into believing that it has a connection to share. The best way to do this is to create for example a dialup connection as in here:


or add an additional WiFi card or other network interface via PCMCIA or a bluetoooth adapter but that would be quite inefficient and rather laborious. Unless there are some very specific needs I would just create the fake dial-up.

What else is there to say?

All of the above IP options will require in the majority of cases a one off connection to a monitor, keyboard and mouse so factor this in if you are off somewhere with a brand new SD card for your tailless Raspberry Pi.

Which of these setup is best it largely depends on your needs but the Link-Local address / APIPA seems by far the preferable especially when using Bonjour.
The ICS is certainly the most confusing and complicated but it can have its uses. If your "portable" lab becomes a bit overcrowded and you need a DHCP for some of the devices, then ICS could be your friend. Here is an example:


If your "portable" setup becomes a bit more complex and you have devices that need an IP delivered with a DHCP, ICS is your friend.  In the picture above I have a tailless Pi connected to a switch to which are connected the laptop and a security camera. The camera can only do static IP or DHCP hence the need for ICS when on the move.


Also ICS inherently allows you to know the IP of its clients as by assigning them an IP that also generates an entry in the ICS's ARP cache. By inspecting it we can immediately tell which IP have been assigned making connecting to them a lot more easy even in the absence of mDNS / Bonjour.

A good part of what has been said in this article and in the previous one applies to the Raspberry Pi A/A+ and to the Zero but not in all cases. These configurations are meant to use a real Ethernet card and won't always work for the likes of the Ethernet Gadget as in this article from Adafruit. I will explore this at some point and see what of the above is applicable in this case and what should be adjusted.

The cables to make the Pi tailless are only two, could I use a Wireless connection instead of the short Ethernet? I don't see why not but it would make things a bit more complicated and confusing. The Ethernet cable guarantees a really good connection to the laptop and it is not prone to the various problems the WiFi inherently has. Tiding up the Ethernet with the power cable should not be a big problem and I would stick with that. This is until the USB gadget configuration is easier to setup and use, that may be a real game changer.