Showing posts with label Raspberry Pi. Show all posts
Thursday, February 18
The ultimate lean mean Pi hacking machine!
As I was writing my previous two articles Upgrade you old laptop with a Raspberry Pi and take two of the same I was thinking that it would have been really cool to be able to attach the Pi on the laptop in a way that it would have been easy to detach if need be and that it wouldn't have had to be permanent. Some laptops aren't as decrepit as mine and having the possibility to remove whatever I was going to use to attach the Pi was important.
After a while I came up with this little kit which is just enough to get your Pi tailless but that could be further expanded to allow for physical computing experimentation via the GPIO and a breadboard.
An OS that is really promising as the ideal companion of this kit is SBIOS which would make this whole thing the ideal lean mean Pi hacking machine.
Saturday, February 6
Upgrade you old laptop with a Raspberry Pi - take two
What if you want to connect your Raspberry Pi tailless but use a Windows OS on your laptop?
Well don't despair, there are ways to do that and a few tricks that will allow you to do so under several circumstances.
So let's recap what do we want to achieve. We want to connect a Raspberry Pi to a Windows computer, typically a laptop so that we can use the Keyboard, the Mouse and the Monitor of the laptop and replace its "engine" with a Raspberry Pi.
Old laptop or not this solution also makes for a great way to make your Pi a lot more portable. In this tailless configuration the only cable you might have is the power supply to your laptop!
Be weary that I have used a Windows 7 for the laptop and Raspbian Jessie for the RPi. Things may be slightly different using other versions.
This article should also serve as an Errata Corrige for my previous one with regards to the Pi's support for Link-Local address. I will amend the previous post ASAP.
Requirements
Laptop
HW:At least two USB ports
Ehernet adapter
WiFi card (optional)
SW:
A functioning Windows OS
VNC or RDP client
RPi
HW:WiFi card
Ethernet card
SW:
VNC or RDP server (which regrettably needs to be installed upfront)
To glue them together we also need a USB Y cable and a 20-30cm Ethernet cable (Cat 5e or +) straight or crossover.
Networking
The first hurdle that we need to solve is how to try to make the laptop talk to the Pi at IP level. For that to happen the two must be connected at layer 1 and 2 of the OSI stack. The Ethernet cable plugged in your laptop's NIC and in the Pi's one does just that. It provides physical connectivity and data link. What we don't get as easily is two IPs in the same subnet.
This can be achieved in many ways, let's see a few.
Bonjour Windows
First things first though let's talk about how to allow Windows to resolve the
That we are going to use to connect to the Pi independently from its IP address. Dealing with IP addresses is in fact quite a pain, that's why DNS came about after all. In my previous article I mentioned the good that comes with mDNS so that you can reach raspberrypi.local independently to which IPv4 or IPv6 you are using on the Pi.
raspberrypi.local
That we are going to use to connect to the Pi independently from its IP address. Dealing with IP addresses is in fact quite a pain, that's why DNS came about after all. In my previous article I mentioned the good that comes with mDNS so that you can reach raspberrypi.local independently to which IPv4 or IPv6 you are using on the Pi.
Windows does not come natively with mDNS but there is a piece of software that we can install from Apple to install this protocol under Windows. Apple's interpretation of mDNS is called Bonjour and can be found here
Installing it is extremely easy and you will be able to use it straight away. Thanks Apple!
Once installed if you check the services running on your laptop you should see something like this:
Back to IP now. The first thing you should do it to disable any protocol and service that is not quite necessary from the Local Area Connection Property page of your laptop Ethernet's card. This is what I did:
Once installed if you check the services running on your laptop you should see something like this:
Back to IP now. The first thing you should do it to disable any protocol and service that is not quite necessary from the Local Area Connection Property page of your laptop Ethernet's card. This is what I did:
Using APIPA
169.254.0.0/16 or 169.254.0.1 through to 169.254.255.254 with 169.254.0.0 being the subnet and 169.254.255.255 being the broadcast address. The network mask is 255.255.0.0.
Which in itself is quite a lot of technical gibberish but bare with me.
Now in the absence of a DHCP a Windows system (or any other OS supporting Link-Local address) will be configured as 169.254.x.y and this is the case for the Pi too with Raspbian Wheezy or Jessie.
I know I have said in my previous article that it didn't but ... it turns out it was grapevine knowledge which I would have been better off verifying first. I'll amend the other article ASAP.
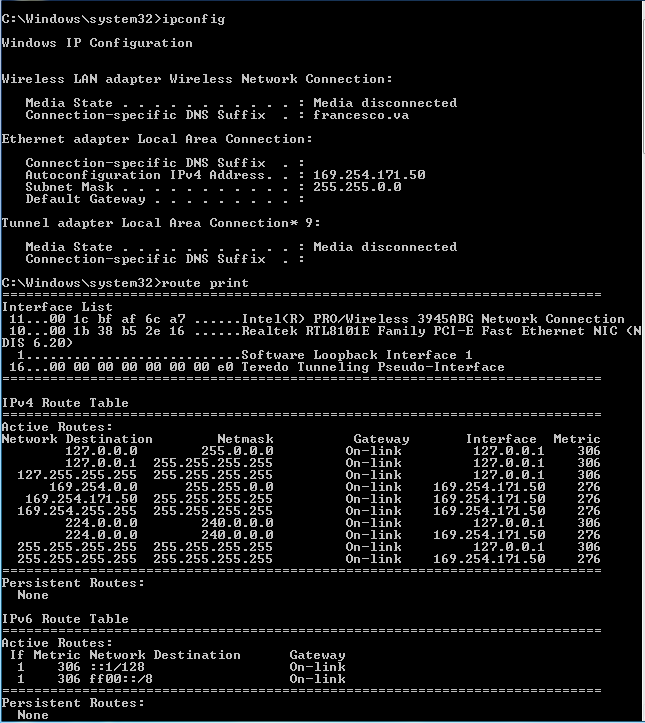
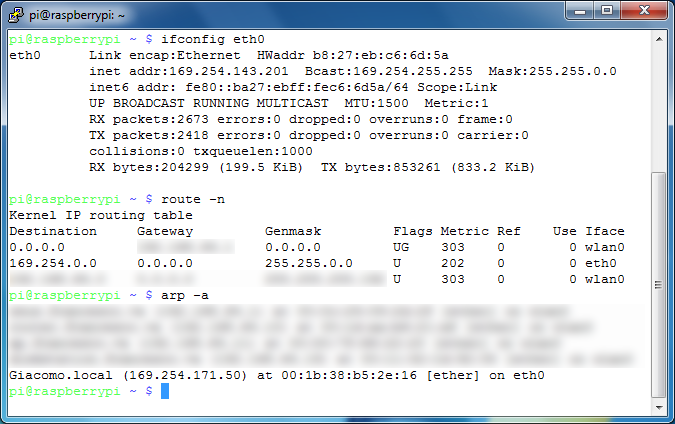
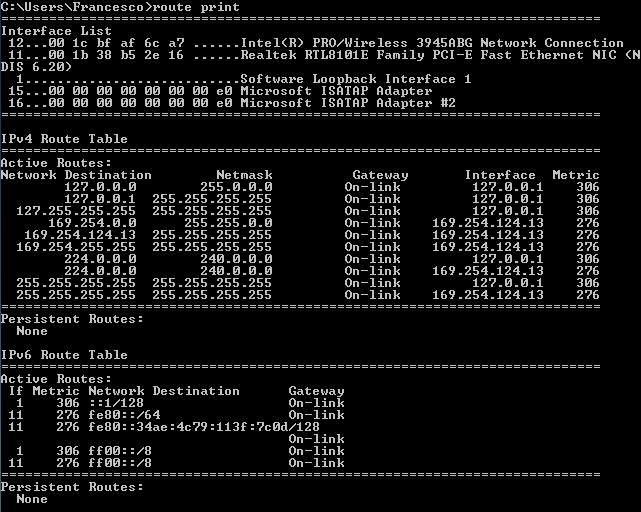
The following screenshots illustrate the status of the adapters and of some other aspects at the network level of both the laptop and the RPi.
Note that once the two hosts communicate with each other the IP of the RPi will be evident in the ARP cache of the laptop
Booting your Pi after plugging the network cable and power is enough for your laptop to resolve raspberrypi.local in an IP 169.254.x.y with no extra hurdles. At this point you could already connect to your Pi via VNC by configuring the service on the Pi as I explained in my previous post
About IPv6
All works well also with IPv6
The Pi's sets itself up with an IPv6 and from the laptop pinging raspberrypi.local will successfully resolve and reach the Pi's IPv6 address:
As well as the IPv4.
These are screenshots of the laptop's network info:
Static IP addresses
dwc_otg.lpm_enable=0 console=ttyAMA0,115200 console=tty1 root=/dev/mmcblk0p6 rootfstype=ext4 elevator=deadline fsck.repair=yes rootwait ip= x.y.z.w
You need to edit the cmdline.txt file in /boot and add the part highlight in bod above. Make sure that all the text is on one line only.
The format is ip=<client-ip>:<server-ip>:<gw-ip>:<netmask>:<hostname>:<device>:<autoconf> so you can add other parameters if you need to. The netmask might be one that you want to set right.
More simply you could configure the eth0 of the Pi once it is booted if you have access to the GUI before making it tailless on your laptop. A good time to do this is when you install you VNC server
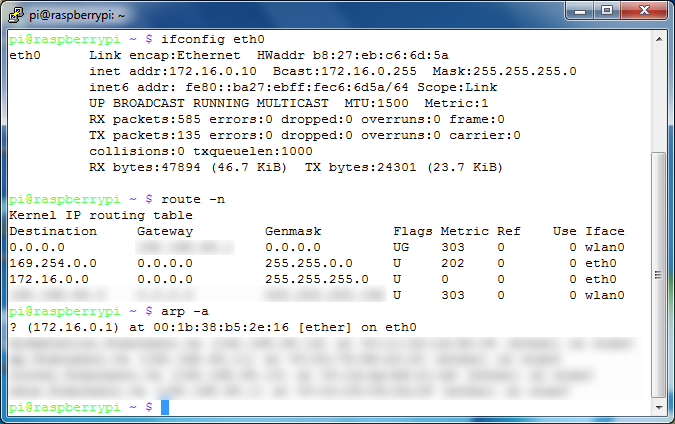
The following screenshots illustrate the status and configuration of the adapters and of some other aspects at the network level of both the laptop and the RPi.
DHCP via ICS
Now we could be interested in just that but I said that we wanted to use old laptops just as KVMs not also as Internet gateways, there is nothing wrong with that but accessing the Pi from elsewhere than the laptop with this configuration may be troublesome if not plain impossible.
What we are very much interested in is the fact the ICS transforms the Windows OS in a DHCP on the shared network adapter so that we can have our IP!
To configure ICS in Windows the sharing must be activated on the interface that we are going to be using as gateway. In my example below I am using my WiFi as gateway and activating the share on the local network adapter
Once that's done the local network adapter will receive an IP address in the range 192.168.137.0/24 which topically will be 192.168.137.1
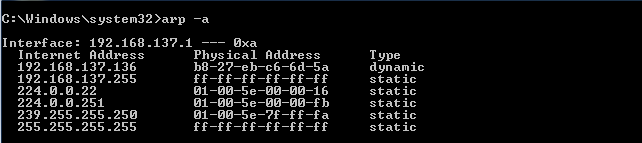
Note that as the laptop provides an IP to the Pi, the Pi's address can easily be found by looking at the ARP cache of the laptop
The Pi receives an IP like 192.168.137.x as did mine
All this good though comes at a price. The DNS resolution and the default route of the Pi are configured as if we wanted to use the laptop as our gateway. In order to use the Pi's WiFi card instead we need to alter the file
/etc/resolv.conf
And comment out the line which bares the IP of the laptop.
Next we need to remove the default route once that has once again the IP of the laptop by running:
sudo route del -net 0.0.0.0 gw 192.168.137.1
Lastly we need to setup the IP as static on the Pi as explained in the previous section and this time use the IP we were given with ICS which was 192.168.137.136. Make sure to untick "Automatically configure empty options".
Tip
You can change the subnet 192.168.137.0/24 to whichever you prefer by editing the registry
HKEY_LOCAL_MACHINE\System\CurrentControlSet\Services\SharedAcces
there is a nice article explaining how to
I only have an Ethernet card on my old laptop
or add an additional WiFi card or other network interface via PCMCIA or a bluetoooth adapter but that would be quite inefficient and rather laborious. Unless there are some very specific needs I would just create the fake dial-up.
What else is there to say?
All of the above IP options will require in the majority of cases a one off connection to a monitor, keyboard and mouse so factor this in if you are off somewhere with a brand new SD card for your tailless Raspberry Pi.
Which of these setup is best it largely depends on your needs but the Link-Local address / APIPA seems by far the preferable especially when using Bonjour.
The ICS is certainly the most confusing and complicated but it can have its uses. If your "portable" lab becomes a bit overcrowded and you need a DHCP for some of the devices, then ICS could be your friend. Here is an example:
If your "portable" setup becomes a bit more complex and you have devices that need an IP delivered with a DHCP, ICS is your friend. In the picture above I have a tailless Pi connected to a switch to which are connected the laptop and a security camera. The camera can only do static IP or DHCP hence the need for ICS when on the move.
Also ICS inherently allows you to know the IP of its clients as by assigning them an IP that also generates an entry in the ICS's ARP cache. By inspecting it we can immediately tell which IP have been assigned making connecting to them a lot more easy even in the absence of mDNS / Bonjour.
A good part of what has been said in this article and in the previous one applies to the Raspberry Pi A/A+ and to the Zero but not in all cases. These configurations are meant to use a real Ethernet card and won't always work for the likes of the Ethernet Gadget as in this article from Adafruit. I will explore this at some point and see what of the above is applicable in this case and what should be adjusted.
The cables to make the Pi tailless are only two, could I use a Wireless connection instead of the short Ethernet? I don't see why not but it would make things a bit more complicated and confusing. The Ethernet cable guarantees a really good connection to the laptop and it is not prone to the various problems the WiFi inherently has. Tiding up the Ethernet with the power cable should not be a big problem and I would stick with that. This is until the USB gadget configuration is easier to setup and use, that may be a real game changer.
Thursday, January 28
Ryanteck TrafficHat
Who wouldn't love to build a TrafficHat! Find out where to get one for your Raspberry Pi and how to go on assembling it and programming it.
Here you can find Ryan's documentation on his Wiki and the test code I have used for the traffic light
Also if you need to install GPIO Zero:
Here you can find Ryan's documentation on his Wiki and the test code I have used for the traffic light
Also if you need to install GPIO Zero:
sudo apt-get install python-gpiozero
or for Python 3
sudo apt-get install python3-gpiozero
Wednesday, January 27
Raspberry Pi GPIO Reference Card Comparison
It has been really hard to decide who the winner of this review was. Ultimately though the scoring results identified without doubt the best of these products.
Find out which by watching the short video below.
Monday, January 25
Upgrade your old laptop with a Raspberry Pi
Have you ever wondered what to do with that old laptop you kept for so long because you never had the heart to trough it away?
Plug a Raspberry Pi2 into your old laptop and give it a second life! Also wouldn't it be great to get your Pi around the house with a very portable setup? I know you get a Pi-Top (I'll admit it's cool but $269.99 without the Pi!!!), you can get a Touchscreen even the original from the Pi Foundation, but the recycler in me sometimes screams for justice.
This setup I am using costs near to nothing and gets the dust off those useless laptops in the loft.
The idea is pretty easy; we get a Pi, plug it in two USB ports of the laptop via a Y cable, connect it via the Ethernet port to the NIC of the laptop, VNC into the Pi, configure the Wi-Fi and job done.
Fix the Pi on the back of your laptop's screen with whatever you can think of and enjoy a Pi with no dangling cables but with a nice keyboard, video and mouse setup.
I made sure that the steps to follow are as simple as possible and that the configuration should work in the majority of situations. By all means this can be further improved and I'll be glad to hear from anybody who might have suggestions.
The configuration and setup can be replicated pretty much on any laptop you might have, even a new one!
Hardware requirements
2 USB ports
1 NIC ethernet
1 Working keyboard and 1 Working Touchpad/Mouse :)
1 Working Screen :))
Mine is quite old as you can see
The Pi needs a Y USB cable with the usual micro connector on the other side. This StarTech 1 feet USB Y Cable for External Hard Drive - Dual USB A to Micro B can do just the job.
A short (20-30 cm) Ethernet cable CAT5e would be more than enough.
Finally a compatible Wi-Fi card.
This is essentially it from the HW point of view. The reason for the Y cable is to make sure that the Pi receives enough current to power itself correctly. Each USB ports in USB1/2 delivers a maximum of 500mA so if you have a laptop of that era you certainly need the Y cable.
The Ethernet cable doesn't need to be a cross-over although that wouldn't hurt if it is. The Pi is capable of Auto MDI-X and will be able to adjust to a straight or a crossover cable directly connected to the laptop; no Ethernet HUB/SWITCH required.
Software configuration
Most NetworkManager distributions should allow for "internet connection sharing" for each network cards. This allows for the laptop to use a service called Dnsmasq to provide automatic configuration of networking parameters for the guests, in our case the Pi. Great!
This is how I configured my laptop:
Once the "internet configuration sharing" is setup our Pi can be plugged in in the USB ports of the laptop and hooked to the Ethernet cable.
After a while we should have an IP for the PI but we are not going to know which is going to be that easily. Luckily both Rasbian and Elementary (Linux in general does) support something called mDNS out of the box. mDNS is for DNS what Link-local address is for IP (you know those 169.254.x.y addresses?) and it allows for DNS names to be setup "democratically" amongst computers in the same network. Raspbian sets its name as
raspberrypi.local
and once it gets an IP you should be able to ping raspberrypi.local without knowing the IP, excellent!
If you can ping it, you can SSH to it and that's the next thing to do.
We SSH to the Pi and start the VNC server (of course there will be a one off password to setup, keep it simple and use the Pi user password).
The server should be started with the same resolution of your laptop screen as we want to run the Pi in full screen on the laptop. The command to run on the Pi will be something like:
vncserver -geometry 1280x800
or whichever is the resolution of your laptop, I hope you know how to find it :)
One thing you may find in fact is that once in fullscreen the keyboard is not working on the remote session. To fix this I had to edit /etc/X11/app-defaults/Vncviewer as sudo
sudo nano /etc/X11/app-defaults/Vncviewer
This is distribution dependant and you might have to look elsewhere for this file depending on what you run on the laptop.
The line that we are uncommenting is:
Vncviewer.grabKeyboard: true
xtightvncviewer raspberrypi.local:1 -fullscreen -compresslevel 3
we are connecting on host raspberrypi.local on screen 1 in fullscreen and compress the session to get better performance. I made a script just not to have to type that all the time.
You can play with compresslevel from 0 to 9 where 9 is less compressed. The network should not be the bottleneck as it is a dedicated fast-ethernet connection but the video card on you old laptop might be the one not actually able to keep up.
If the command above succeeds you should be prompted for the VNC server password you set earlier on and after that you should finally be in your Pi's desktop!!
We are not done yet unfortunately, a few more tweaks.
The first thing to do on the Pi is to configure the eth0 card as static IP.
The reason is still within the realm of keeping things as simple as possible. You remember that Dnsmasq you mentioned earlier? Well as a good DHCP it will keep on refreshing periodically the information of the Pi's Ethernet adapter not only with IP and Mask but also with Gateway, DNS and default route. Now, after we will enable the Wi-Fi card on the Pi we'll want for the default route and the DNS server to be only the ones of the Wireless card not the ones configured from the DHCP server on the laptop. This will ensure that the Pi will be able to connect to the internet only through its Wi-Fi card.
The best thing to do is to configure the IP address of the Pi's eth0 as the one it used to receive from the DHCP's laptop and
uncheck "Automatically configure empty options"
leaving the Router and DNS sections empty.
Next we need to edit:
sudo nano /etc/resolv.conf
on the Pi to remove the settings obtained from the laptop. We need to remove the line that says:
nameserver 10.42.0.1
or whichever is the IP of your laptop
it should look like this:
Lastly we need to remove the default route 0.0.0.0 associated with the laptop's address, in my case:
sudo route del -net 0.0.0.0 gw 10.42.0.1
so that the routes will look like this:
At this point we'll need to configure the Wi-Fi connection on the Pi in the standard way and we should be done!!!
After these steps connecting again should be just a question of powering up the laptop, starting the VNC server on the Pi (which can of course be set to start automatically) and VNC into the Pi.
What is left to do
A lot more automation can be done. When the laptop shuts down for example we should be able to also run a clean shutdown and wait for the Pi to be off before shutting down the laptop. The VNC session could also be run automatically at the startup of the laptop including passing the password for the Pi. The initial configuration of things for both the Pi and the laptop could be scripted to make things easy even for the less expert.
Finally get a better networking configuration, I hate that thing about the network mask!!
Also some good designer cloud come up with maybe a 3D printed enclosure or VESA fix like structure that can be adjusted to most laptop screens. It'll be nice to find a way to accommodate a breadboard too although having it always fixed on the back of the screen might not be ideal.
I leave it here I guess but this is clearly far from being something to "resell".
If your laptop comes with a Wi-Fi interface then you could use that to connect the Pi to the internet in a much more traditional ICS configuration. This hides the Pi behind a NAT and for the majority won't be a problem and work great, I preferred to use the laptop just as a KVM though.
I must admit that I have tried to find out whether the Pi supports Link-local address which would have made things less complicated but I couldn't find much about this and eventually opted for the more cumbersome "internet connection sharing" approach.
I leave it here I guess but this is clearly far from being something to "resell".
Notes
I must admit that I have tried to find out whether the Pi supports Link-local address which would have made things less complicated but I couldn't find much about this and eventually opted for the more cumbersome "internet connection sharing" approach.
TIP
06-02-16 - UPDATE
Link-Local Address
Since I wrote this article I made a bit more research into the matter of Link-Local Address and specifically with regard to the support of this in Raspbian. It turns out that the Pi is more than capable of supporting IP auto configuration and this is in fact the quickest way to go about configuring the Pi in tailless mode (I like calling it this way!).
By configuring the laptop Ethernet interface as Link-Local only the adapter will get a 169.254.x.y address and will be immediately ready to resolve raspberrypi.local.
Subscribe to:
Posts (Atom)