During the Black Friday and Cyber Monday I got hold of a few good deals from a few shops, one that I was particularly curious about was Ryanteck and I bought a couple of items which I have reviewed, build and tested in the videos below.
I really had fun with the Motor Controller and found the USB Charger Doctor to be a really useful tool.
Being able to connect to a server somewhere out in the wild or in the neighbourhood of your local network is certainly something that has been going on for decades.
The most common activities that one would want to perform on a remote server are:
Issue commands
Transfer files
Commands needs User Interfaces which can either be:
Text based aka terminals
Graphical User Interface aka GUI
All of this have to be complimented with a number of protocols that allow the act of remoting from a client to a server.
Let's see what happens in the most frequent cases.
SSH
Issuing commands to a remote server is mostly done by using the SSH protocol. The Raspbian OS comes with an SSH server enabled by default so all we need to do is to get the right client for the platform from which we want to connect from.
On Windows the best know is PuTTY which in its basic incarnation looks like this
and it is an incredibly great tool to issue commands in a very versatile terminal window.
Somebody else built on top of PuTTY and tried to get to grips with the clatter caused by the need of having to deal with many sessions all opened at once.
The tool is MTPuTTY which is what it says on the tin: Multi-Tabbed PuTTY !
Fantastic, but if you are really hard core and you live in an era where virtual machines had not been invented, you can still use the never ageing Cygwin (although you might actually have good reasons to use it in favour of a VM)
SFTP and SCP
Of course one of the most important things to do on an operating system which revolves all around files is to be able to move them back and forth, around and about via SFTP or SCP whenever this last one might be preferred.
SFTP on Raspbian come as part of the SSH server and also in this case there is nothing to be done on the Pi.
My favourite tools are Filezilla and WinSCP although the humble PSFTP installed with PuTTY can still do a great job if nothing else is available.
A great thing of WinSCP is that it will be able to import all your PuTTY sessions as you install it and it supports SCP along with SFTP. In many instances I have seen people preferring WinSCP to Filezilla.
Filezilla though has my preference as it still supports FTP which is still somewhat handy for the likes of uploading content to websites.
There is of course more to see and discuss about these two great clients but it is time to move on to the next set of tools.
VNC
Text based terminals are great but we live in an extremely visual world and Graphical User Interfaces are preferred by many with good cause. One of the obvious desires then is to be able to interact directly with the Raspbian desktop and this can be achieved using some form of Virtual Network Computing based software.
There are quite a few incarnations of VNC servers and clients and although Rasbian doesn't come with a specific one the Raspberry Pi foundation seems to point to TightVNC which can be installed fairly easily following their simple guide.
As for the client side ... well there are quite a few but I use RealVNC which covers quite a few platforms and does the job excellently. Remember that your display will be display 1 and that to indicate to the VNC client that you are not connecting to the default screen 0 you will have to write <IP Address>:1 e.g. 10.42.0.53:1
X and the rest
If you feel more adventurous you can try the ways of the X server. The X Window System is based on the X11 protocol and has been on the scene for many years.
The advantage of this approach is the possibility to run programs that need a graphical interface from you terminal session. If for example you would need to quickly run the Pi's browser whilst working via PuTTY, you can simply invoke epiphany and an X windows displaying the browser will come up on your screen.
Counterintuitively the X server will have to be installed on your "from" location.
I have always used Xming as it installs really easily and integrates perfectly with PuTTY.
Just remember to enable X forwarding in your PuTTY session before connecting.
As you run Xming nothing will seem to happen but the program's icon will be displayed in the notification area.
Running a command from PuTTY that will open up in X will result in an X icon being shown in your taskbar and that is for all matters and purposes a window within your client system.
Of course the best way to go to a Linux box is with a Linux box and this can be achieved in a number of ways. All of the above can be done from an Ubuntu machine whether it is your default operating system or you are running an instance as a virtual machine of your Windows host. The software to use will be rather different for the majority but the mechanisms described are the same.
One strange beast to mention in this realm is Cygwin which, as they say on its website, "is a large collection of GNU and Open Source tools which provide functionality similar to a Linux distribution on Windows"
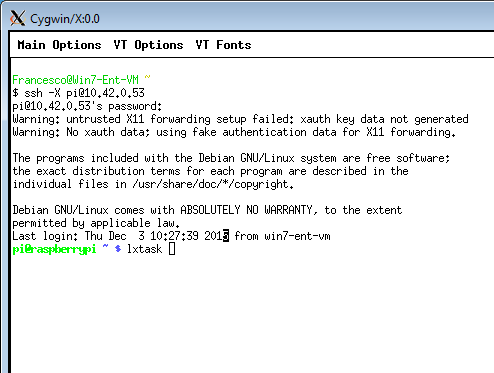
and that in fact will allow to work on your Windows box in a "Linuxy" way. One thing we could obviously do is to connect to a Pi from a Cygwin terminal. We can type in xinit and the following whitish window will pop up to indicate that an X server is available! Fantastic
Let's type in a few lines to connect to our Pi and in my case the command is:
ssh -X pi@10.42.0.53
This means that I am using the SSH client in Cygwin on which I am enabling X forwarding (-X) to my Cygwin X server and connect as the user pi to 10.42.0.53
Once I give the password I am in my Pi as shown by the green prompt. From there I can launch lxtask and get my graphical task manager displayed via Cygwin. Isn't that the most useless thing? :)
Jokes apart though this shows probably one of the many coolest ways to connect to a remote Linux box and it is as close as native Linux as you can get on a Windows computer.
That's all folks
These tools covered most of the use cases that you will ever encounter but bare in mind that what I have listed here are only some of the tools that are available. Also the majority of what I described applies only to Windows. There is of course much more, there is also Apple stuff and one and a million way to do things in Linux.
Note that some of these softwares are also distributed as executable instead of full install. This is great when you want to carry your tools around on a USB key or when the administrators of the systems on which you need to work aren't too lenient on you installing new software. So when downloading check which type you are getting hold of.
Mostly if you can spare some money for those projects that accept donations you can play an important role in promoting what's good out there, right?
This closes "all the tools you'll ever need to remote into your Pi".
Have fun
In this video playlist I am going through the steps needed to connect remotely to a Raspberry Pi terminal session.
In a nutshell the videos will show the following:
You bought yourself a shiny new Raspberry Pi, maybe the brand new Pi Zero and now you are really fidgety about doing something exciting with it but ... there are a few things that need to be done first.
I have provided three complementary videos that you can watch to go through the entire process or if you prefer you can go through the following brief instructions
This is in a nutshell what needs to happen:
Get an SD card
Format the SD card
Transfer NOOOBS onto the card
Boot your Raspberry Pi with NOOBS
Select and install the Operating System
The first thing you need to do is to get yourself an SD card with a suitable Operating System installed on it so that the Raspberry Pi can run all the basic software that is needed for it to do anything.
At this point NOOBS is your friend!
NOOBS is a piece of software that will help you installing the Operating System onto the SD card.
This can go either of two ways:
Buy a card with a preloaded NOOBS on it
Reuse one you already own and prepare it with NOOBS yourself.
The preferred Operating System for the Pi is Raspbian and its latest incarnation is called Jessie. The names of the versions of this OS are coming from Toys Story, the previous one in fact was called Wheezy!
Now Wheezy's character was a bit chubby and Jessie's was quite slim in the cartoon but despite this you will need a bigger SD card to store Jessie than you would have with Wheezy as the OS Jessie is a bit bigger than its predecessor. With this in mind make sure you use at least an 8 GB SD card for your Pi.
Follow this section only if you are reusing you card
If you are going to reuse your card you have to first format it or in other words prepare it to be able to transfer NOOBS onto it, to do so you can use a software called SDFormatter. It is a really easy install to perform and you can use the videos provided if in doubt.
Make sure to backup the contents of your SD card before proceeding as the tool will delete all files in it
Select the right drive letter corresponding to your SD card and click on Format. You will have to accept a couple of alert messages and you card will be ready shortly after.
Once the card is formatted you will need to transfer NOOBS on it. First of all let's get hold of NOOBS.
Once downloaded (it will take a while) it will have to be unpacked in a temporary folder of your choice.
With the content unpacked you will now have to select all the files and copy/paste them onto the SD card you have just formatted (that also will take a while).
The card is now ready to be ejected from the card reader and plugged into the Raspberry Pi.
Whether you have used your own card or purchased one with NOOBS pre-installed this is what needs to happen next
Make all the necessary connections to the video, the network, the mouse and keyboard and finally plug the power supply in.
After a short while you should lend onto this page
Select install near to Raspbian and ... after a while and a few rather useful information displayed during the installation, the process will terminate and prompt you for restarting into Rasbpian for the very first time.
Great! You made it, your Raspberry Pi is now ready for many adventures to come
Here are the embedded videos mentioned above
HW preparations to get started
Prepare the SD card, get hold of Noobs and transfer it onto the card
I have been very surprised time and time again every time I would go to the recycling centre by the amount of good quality things that get thrown away on a regular basis. Each time I would visit to dump I have always find time to have a peek at the electric and electronic appliances skip.
It is amazing to notice how people overcome their imposed limits and would pick things up as well as chuck their stuff away. Especially on a weekend there will be even some habitué who would always be at the recycling centre to be sure never to miss the best "donations" of the day and I thought : "Why not?" Why shouldn't we all do that without inhibitions and in fact with some sense of pride. "I recovered something from the garbage and gave it a second life"
It is a win!, win^2! loose?
It is a win for me as I get something for free.
It is a double win for the environment as the item doesn't need to be created again just for me and doesn't need to be destroyed. Destroying is the counterpart of creating and it is the counterpart of the costs that are not quite taken into account when giving a value to an item as it hits the market. Destroying or in the best case recycling costs money in the act of collecting and transforming our "garbage" and worse of it all, leaves a heritage to the future generations that will have to find a way to deal with it, most probably with additional costs.
It is a loose for industry maybe. Well industry needs to modernise itself and find a different way to survive, why not re-purposing items and reselling them?
Rant apart, here is the video of what I found at the recycling centre and the hurdles I had to overcome to get my bounty.
Every Tuesday morning a volunteer helps the local charity shop to PAT test all electrical donations. On Tuesday afternoon I would be visiting the shop to see what goodies has the generous community given away.
In October I found a nice Kensignton laptop stand which came connected to a WiFi USB card from Netgear.
In the video below I went through this £5 purchase to see what could be salvaged and what could be chucked away.
A pinch of pygame, a hint of scapy and the Halloween concoction is ready!
This year's automated scarer was a bit more challenging than last. I stitched this together in a couple of days and ... it worked mostly as I wanted it to be. The most important thing is that children and parents enjoyed being scared by a few monstrous pumpkins and a bunch of my son's very horrific (but beautifully made) drawings.
Raspberry thirsty Vampire
Scary Witch of the South East
I wanted the animation to be easy to be activated and yes, I could have used other methods to detect people to be scared (which from now on I will refer to as scarables: a person suitable for the scarer) but I was curious about scapy and the possibility of detecting mobiles passing by.
I also found quite interesting digging through the enormous amount of information available on pygame which served perfectly the purpose of displaying the pictures and playing the sounds all of this without needing to drop into X leaving ample resources available on my RPi B It is also entertaining to lookup the MAC addresses I collected to establish if we live in a posh area or not. The amount of Apple devices wasn't so many in the end, I will consider selling and buy elsewhere. Ah and don't worry, the MACs I collected will be handed over to TalkTalk for safe keeping.
The Python script revolves mainly around the scapy command sniff which I used to search any broadcasting WiFi device within reach of my dongle.
The first thing to do is to setup the WiFi card into monitor mode which is done outside of python on the shell:
#/usr/bin sh
sudo service ifplugd stop
sudo ifconfig wlan0 down
sudo iwconfig wlan0 mode monitor
sudo ifconfig wlan0 up
sudo service ifplugd start
You can verify things are set properly by issuing iwconfig, this is my output:
Within scapy's lamda function we need to create a list to hold the MAC addresses that we'll acquire. Around the area where I live there are normally quite a few Access Points and other WiFi devices. The first thing to do then is to store all these MACs on a file so that they will not trigger any false "scares" each time that the Pi starts. I did this by running the script in "silent mode" for a couple of hours. I had created in this way a WiFi fingerprint of the area which I stored on a file that gets read at the start of the script and pre-loads all the MACs in the neighbourhood.
if path.isfile(fileName):
with open(fileName, 'rb') as MAC_file:
MAC_list = pickle.load(MAC_file)
for the serialisation I am using pickle which for the purpose works just fine
From here on any new MAC detected is a potential scarable,
Scapy offers a sniff command that can take as arguments an interface and a function amongst other options.
The store=0 turned out to be vitally important as it tells the sniff command to just monitor the packets and not store them in memory. I learned this the hard way as I the Pi stopped responding all together as its memory got full.
I have obviously specified to monitor packets on wlan0 and given a PacketHandler function which I use to specify what I am interested in about the packets seen by wlan0
def PacketHandler(pkt):
if pkt.haslayer(Dot11):
if pkt.type == 0:
if pkt.addr2 not in MAC_list:
MAC_list.append(pkt.addr2)
with open(fileName, 'wb') as MAC_file:
pickle.dump(MAC_list, MAC_file)
Call the Scare function
the layer I am interested in is Dot11 as in 802.11x and the packet type is 0 as in management. If the MAC is not in my list I will add it and write the list on a file.
The other very important thing that I do in the last if block is that I will start the animation for each new MAC added to the list.
Now, this could have done it in a number of ways, I wanted to explore the pygame events, I wanted to use two threads on for WiFi scanning the other for the animation, in the end at 16:30 of the 31st of November I decided to call a function directly after writing the list to a file.
The Scare function receives a random image and a random sound from two preloaded lists. I paste the PrepareImages only as the PrepareSounds is essentially the same
All .wav and .png files where in the same path as the script.
Everywhere I looked for examples of pygame.image.load I found that it is highly recommended to convert the images to improve performance. I certainly noted an improvement
The Scare function looks like this
def Scare(image, sound, screenSize):
image = pygame.transform.scale(image, screenSize)
frame = image.get_rect()
white = (255, 255, 255)
black = (0, 0, 0)
screen = pygame.display.set_mode(screenSize)
playing = sound.play()
while playing.get_busy():
screen.fill(white)
screen.blit(image, frame)
pygame.display.flip()
pygame.time.delay(1000)
screen.fill((black))
pygame.display.flip()
it will resize the picture (sometimes deforming it as the source did not have the same proportions of the screenSize I selected), set the screen, play the sound.
Whilst playing the sound the picture would be displayed (blit) and a 1 second delay also added to get the shivers deep in the scarable's spine.
After the sound is played the screen turns black again.