
Being able to connect to a server somewhere out in the wild or in the neighbourhood of your local network is certainly something that has been going on for decades.
The most common activities that one would want to perform on a remote server are:
- Issue commands
- Transfer files
Commands needs User Interfaces which can either be:
- Text based aka terminals
- Graphical User Interface aka GUI
All of this have to be complimented with a number of protocols that allow the act of remoting from a client to a server.
Let's see what happens in the most frequent cases.
SSH
Issuing commands to a remote server is mostly done by using the SSH protocol. The Raspbian OS comes with an SSH server enabled by default so all we need to do is to get the right client for the platform from which we want to connect from.

On Windows the best know is PuTTY which in its basic incarnation looks like this

and it is an incredibly great tool to issue commands in a very versatile terminal window.
Somebody else built on top of PuTTY and tried to get to grips with the clatter caused by the need of having to deal with many sessions all opened at once.
The tool is MTPuTTY which is what it says on the tin: Multi-Tabbed PuTTY !

Fantastic, but if you are really hard core and you live in an era where virtual machines had not been invented, you can still use the never ageing Cygwin (although you might actually have good reasons to use it in favour of a VM)
SFTP and SCP
Of course one of the most important things to do on an operating system which revolves all around files is to be able to move them back and forth, around and about via SFTP or SCP whenever this last one might be preferred.
 SFTP on Raspbian come as part of the SSH server and also in this case there is nothing to be done on the Pi.
My favourite tools are Filezilla and WinSCP although the humble PSFTP installed with PuTTY can still do a great job if nothing else is available.
A great thing of WinSCP is that it will be able to import all your PuTTY sessions as you install it and it supports SCP along with SFTP. In many instances I have seen people preferring WinSCP to Filezilla.

Filezilla though has my preference as it still supports FTP which is still somewhat handy for the likes of uploading content to websites.

There is of course more to see and discuss about these two great clients but it is time to move on to the next set of tools.
VNC
Text based terminals are great but we live in an extremely visual world and Graphical User Interfaces are preferred by many with good cause. One of the obvious desires then is to be able to interact directly with the Raspbian desktop and this can be achieved using some form of Virtual Network Computing based software.
There are quite a few incarnations of VNC servers and clients and although Rasbian doesn't come with a specific one the Raspberry Pi foundation seems to point to TightVNC which can be installed fairly easily following their simple guide.

As for the client side ... well there are quite a few but I use RealVNC which covers quite a few platforms and does the job excellently. Remember that your display will be display 1 and that to indicate to the VNC client that you are not connecting to the default screen 0 you will have to write <IP Address>:1 e.g. 10.42.0.53:1

X and the rest
If you feel more adventurous you can try the ways of the X server. The X Window System is based on the X11 protocol and has been on the scene for many years.

The advantage of this approach is the possibility to run programs that need a graphical interface from you terminal session. If for example you would need to quickly run the Pi's browser whilst working via PuTTY, you can simply invoke epiphany and an X windows displaying the browser will come up on your screen.

Counterintuitively the X server will have to be installed on your "from" location.
I have always used Xming as it installs really easily and integrates perfectly with PuTTY.
Just remember to enable X forwarding in your PuTTY session before connecting.

As you run Xming nothing will seem to happen but the program's icon will be displayed in the notification area.

Running a command from PuTTY that will open up in X will result in an X icon being shown in your taskbar and that is for all matters and purposes a window within your client system.


One strange beast to mention in this realm is Cygwin which, as they say on its website,
"is a large collection of GNU and Open Source tools which provide functionality similar to a Linux distribution on Windows"
and that in fact will allow to work on your Windows box in a "Linuxy" way. One thing we could obviously do is to connect to a Pi from a Cygwin terminal. We can type in xinit and the following whitish window will pop up to indicate that an X server is available! Fantastic
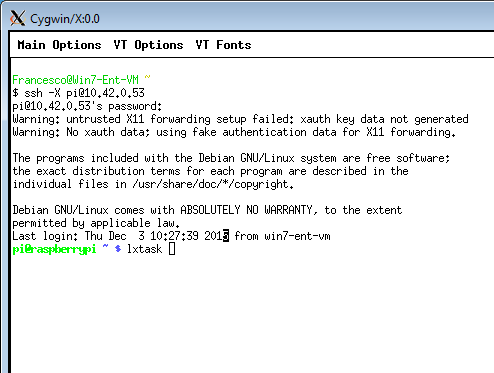
Let's type in a few lines to connect to our Pi and in my case the command is:
ssh -X pi@10.42.0.53
This means that I am using the SSH client in Cygwin on which I am enabling X forwarding (-X) to my Cygwin X server and connect as the user pi to 10.42.0.53
Once I give the password I am in my Pi as shown by the green prompt. From there I can launch lxtask and get my graphical task manager displayed via Cygwin. Isn't that the most useless thing? :)

Jokes apart though this shows probably one of the many coolest ways to connect to a remote Linux box and it is as close as native Linux as you can get on a Windows computer.
That's all folks
These tools covered most of the use cases that you will ever encounter but bare in mind that what I have listed here are only some of the tools that are available. Also the majority of what I described applies only to Windows. There is of course much more, there is also Apple stuff and one and a million way to do things in Linux.
Note that some of these softwares are also distributed as executable instead of full install. This is great when you want to carry your tools around on a USB key or when the administrators of the systems on which you need to work aren't too lenient on you installing new software. So when downloading check which type you are getting hold of.
Mostly if you can spare some money for those projects that accept donations you can play an important role in promoting what's good out there, right?
This closes "all the tools you'll ever need to remote into your Pi".
Have fun
Note that some of these softwares are also distributed as executable instead of full install. This is great when you want to carry your tools around on a USB key or when the administrators of the systems on which you need to work aren't too lenient on you installing new software. So when downloading check which type you are getting hold of.
Mostly if you can spare some money for those projects that accept donations you can play an important role in promoting what's good out there, right?
This closes "all the tools you'll ever need to remote into your Pi".
Have fun


